Is there a secret to mastering the art of perfectly tied heeled sandals, ensuring both security and a statement look? The answer lies not just in the act of tying, but in embracing innovative methods that transform a simple footwear necessity into a fashion statement, all while keeping your heels firmly in place.
The quest for the perfect laced-up heel often begins with a mix of admiration and frustration. We've all scrolled through countless images, admiring the effortless elegance of lace-up heels, only to struggle with achieving the same effect ourselves. The traditional method, while functional, can sometimes fall short of delivering the desired aesthetic. It's time to explore beyond the conventional and unlock a world of creative lacing techniques that elevate your style game.
Before delving into the intricacies of various lacing styles, it's worth noting the importance of preparation. Begin by ensuring your heeled sandals fit comfortably. Ill-fitting shoes can make even the most stylish lacing techniques uncomfortable and ineffective. Also, consider the materials. The type of laces, the presence of eyelets, and the overall design of the shoe will influence the lacing options available. Heel locks or adhesive strips, readily available at most shoe stores, can provide additional security, preventing slippage and enhancing the overall comfort.
Now, let's dive into the exciting world of alternative lacing techniques. Remember, the key is to experiment and find the styles that best suit your preferences and the specific design of your heeled sandals.
One alternative involves threading the laces through the eyelets in the standard manner, but rather than tying them in the usual way, experiment with wrapping the laces around your ankle. For enhanced support, start by threading the laces through the eyelets on the shoe, making sure to start from the bottom and work your way up, especially if your shoes have multiple rows of eyelets. Then, wrap the laces around the ankle, securing them with a stylish knot or bow at the back of your leg. This not only offers extra support but also introduces a unique visual element, creating a sophisticated look.
Another method requires you to lace your shoes as usual, but do not tie them into a bow. Instead, consider the comfort factor and note how far your laces come out from the eyelet. Unthread one lace from the first eyelet, and experiment with different wrapping patterns around your ankle. This method is excellent for adjusting the fit and ensuring comfort throughout the day.
For a more avant-garde approach, try starting the lacing in the middle of the shoe and working your way outward. Ensure the laces are pulled tightly, but not too tight, and finish with a secure knot at the end. This technique allows for a customizable fit while offering a distinctive visual appeal. You can watch videos online that can guide you in this creative process.
Remember, the perfect lacing style is a journey of discovery. It's about exploring different techniques, adapting them to your individual needs, and embracing the opportunity to express your personal style. Whether you're aiming for practicality, sophistication, or a touch of playful elegance, the world of heeled sandal lacing has something for everyone.
The basic steps remain the same across most lacing styles. Start by threading the laces through the eyelets. If your shoe has more than one row of eyelets, start from the bottom and work your way up. Ensure the laces are pulled through evenly to maintain balance and symmetry. After threading, consider the various tying options, such as wrapping around the ankle, tying a bow at the back, or creating a secure knot. As you thread, watch out the lace tip doesnt cause damage to the shoelace. Adjust for fit and comfort.
Consider the "bow tie" outline. The lacing first runs down the shoe, then doubles back up the shoe. Vertical sections on the inside and crossovers on the outside form a "bow tie" outline. It looks interesting and holds firmly, but is awkward to tighten. However, this method requires minimum shoelace length and thus "lengthens" ends. This style is used on combat boots by various armies and can provide a whole new aesthetic.
Loop king laces are a great way to "Step up your style" and with every pull of your lace is a step towards impeccable style.
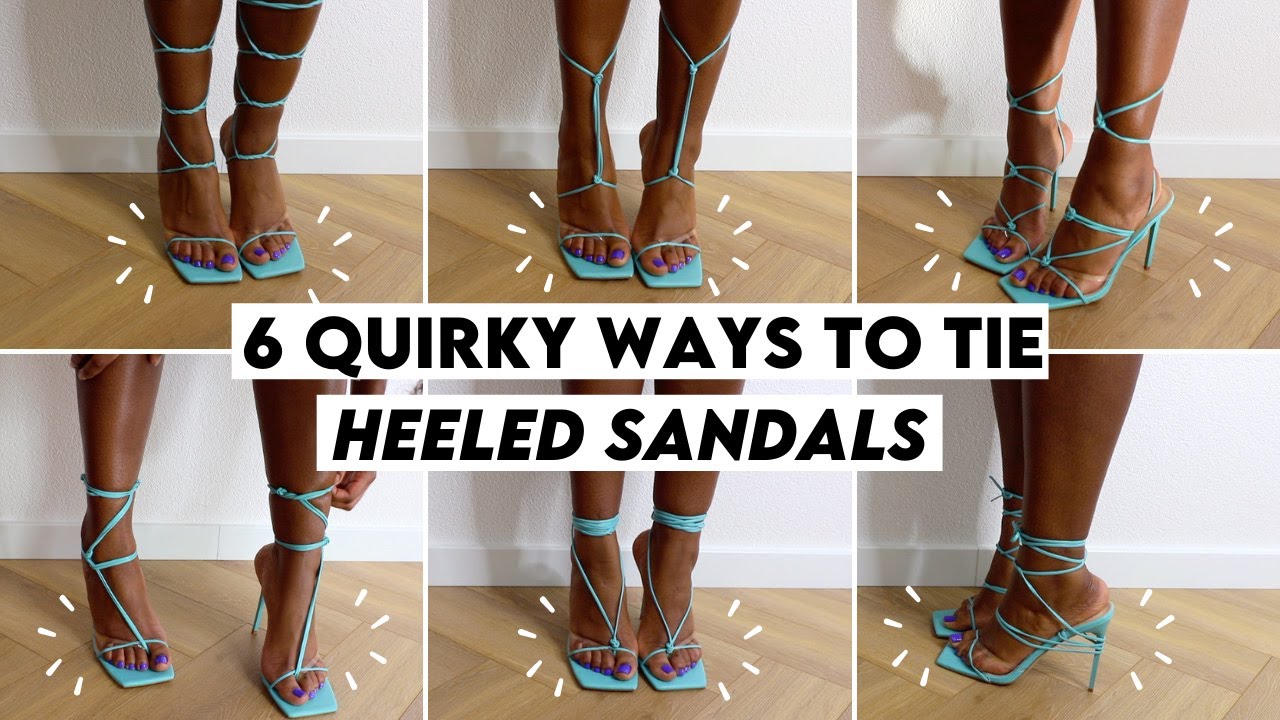
Here's a look at some alternative methods for tying heeled sandals, inspired by online tutorials and fashion influencers:
Method 1: The Basic Wrap and Tie
- Thread the laces through the eyelets as usual, starting from the bottom.
- Wrap the laces around your ankle, ensuring a snug but comfortable fit.
- Tie a secure bow or knot at the back of your leg.
Method 2: The Ankle Strap
- Lace your shoes as usual, but do not tie them into a bow.
- Use the laces to create an ankle strap, wrapping them around your ankle several times.
- Secure with a knot or a decorative bow.
Method 3: The criss-cross
- Start by threading the laces through the eyelets on the shoe.
- Cross the laces diagonally across the front of your foot, creating an "X" pattern.
- Continue crossing the laces up the shoe, alternating sides each time.
- Tie a knot at the end, or secure with a bow at the ankle.
Method 4: The Parallel Lacing with a Twist
- Lace your shoes straight up, on either side of the shoe.
- At the highest eyelets, cross the laces and wrap the lace around your ankle.
- Tie a knot or a bow at the end.
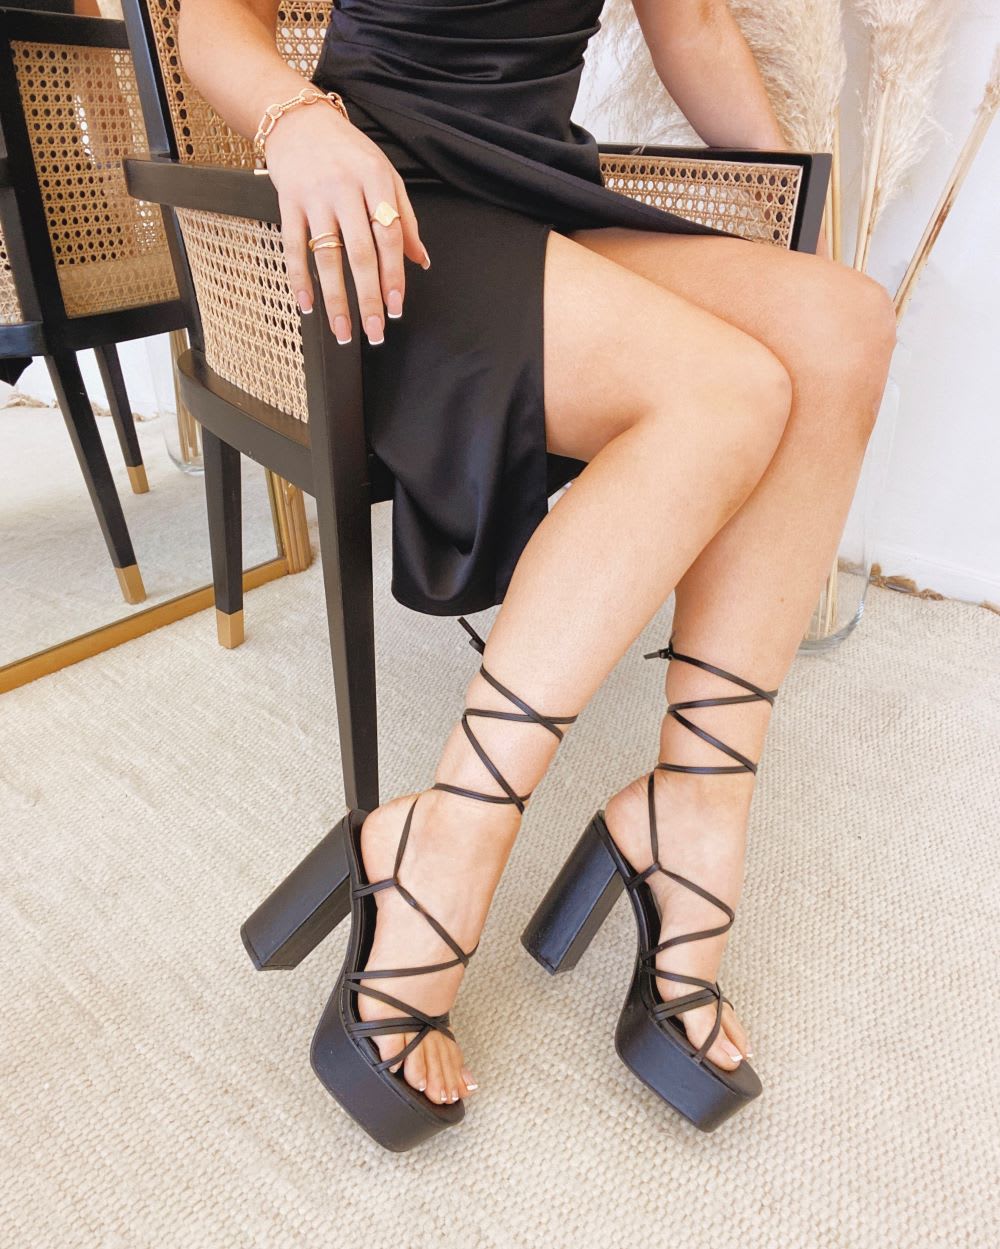
Lacing up your heels may seem like a daunting task, but with a few simple tips, you can keep your heels from falling off.
The key is to start with the laces in the middle of the shoe and work your way out. Make sure the laces are pulled tightly, but not too tight, and tie a knot at the end.
You can watch the video below for more insight:
Additional Tips for Success
- Experiment with different lace materials: Experiment with different lace materials and colors to elevate your style.
- Consider the eyelet placement: the placement and number of eyelets can also influence your lacing options.
- Practice makes perfect: The more you practice, the better you'll become at creating the perfect tie.
Lace up heels are a timeless wardrobe staple for women.
Use your fingers to loosen laces pull laces through eyelets. Use one longer side (about 10cm longer), lace your shoe parallel, all the way up the shoe. Tie the laces up as usual.
Remember to use your fingers to loosen laces and pull laces through the eyelets. Also, when threading through the eyelets for a second time, watch out that the lace tip doesn't cause damage to the shoelace. Every time they're worn, they can provide a whole new aesthetic.
Now you are not just wearing shoes, you are creating your style. With a little practice, you'll be able to tie your lace up heels like a pro!
With the right technique and a touch of creativity, anyone can master the art of tying lace-up heels, turning a simple accessory into a statement piece. With a little practice, you'll be able to tie your lace up heels like a pro!